

Planting and Harvesting Carrots
This spring when we sowed our seeds we really just sprinkled one of our garden beds with the leftovers from three different packets of seeds. We were very hands-off with our carrots this year.
Even with our hands-off approach this season we managed to harvest over 20 pounds of carrots. Due to some of our planting circumstances, some were short and stumpy, some had wild legs, but they were all edible.
After making two batches of my bisque (we’ll talk more about that later) I still had over 10 pounds of carrots that needed to be processed. I stayed up late that first night blanching carrots, which I will show you how to do below, but I still had MORE carrots that I needed to process, but it wasn’t going to happen that night.

I needed to store the carrots for a few days. I had used most of my larger carrots for my bisque and my first rounds of blanching. Since I had mostly small carrots left I kept the carrots fresh and crispy by putting them in a half-gallon mason jar, filled with water and put them in the fridge until I was able to get to them.
This article contains affiliate links and our personal homesteading experiences. We receive a small commission from items purchased through our links and we appreciate every bit of support in making our home a homestead.
Our family loves these reusable lids for our jars when we are storing versus canning.
We like to plant full carrot beds in general and then pull them as needed throughout the latter part of the summer to eat as snack and prepare with meals. My harvest pounds are an estimate, but since we harvested over 14 pounds this fall, when we finally emptied the garden beds, I think the 20 pounds is fairly accurate.
We didn’t intentionally thin them at all throughout the growing season, though the girls picked some to have as garden snacks through the summer, which helped to thin. We also planted them in the same bed as last year.

Most crops are okay to grow in the same bed for 2 seasons, but after that it is a good idea to rotate your plantings. The main reasons for rotating your crops are for soil health. This is both in regards to disease and nutrients.
If your plants the season before had any sort of disease that was detrimental to the crop, that will potentially still be in your soil and will affect your crop the second/third year you plant in that bed.
Then you need to address the soil nutrition. Crops take what they need from the soil. Carrots require lower levels of nitrogen, some phosphate, and higher potassium for good edible root production. When established on a soil with high organic matter, little or no nitrogen fertilizer will be needed.
This also means that they will pull the potassium out of your soil. You can replace this in your soil, but you can also just add regular compost and rotate your crops the next season with something that doesn’t need as much potassium.
You should always test your soil before you add any additional fertilizers that will push your soil in one direction (more nitrogen, potassium, or phosphorous).
Soil health and makeup is important to root vegetables because that is where they are growing, down in the soil. They grow best in well draining soil, that isn’t stoney or doesn’t have clay deposits. The latter two can cause your carrots to be stumpy or have their roots fork.
If you can get carrots to grow, they GROW! You may find yourself with an abundance of carrots all at once.
The switch to fall happens extremely quickly here in Southern Maine, and once that happens and winter begins to loom we have to start to pay close attention to lower temperatures. Carrots are frost hardy to a point.
If you have planted a storage variety you are good to go and there are some really easy no fuss methods of how to store raw carrots in your basement in a nice sawdust bed so that you can fish them out throughout the winter as needed. We went with such an eclectic mix this year that I didn’t want to risk storing them this way and then having mushy or moldy carrots. Read on to find out all the ways we preserved this year.
Carrot Benefits
We love having carrots in our garden as a versatile vegetable that also provides health benefits. I am not a doctor, but we can clearly see there are benefits of carrots. Carrots are nutrient rich, have a low caloric density, and have been linked to healthy vision, and blood pressure regulation. They also might lower your risk of cancer and heart disease. Those are a lot of positive reasons for us to continue to grow carrots in our garden.
Carrots are one of the vegetables that are actually more beneficial if you eat them cooked versus raw. Once they are cooked your body has a much easier time absorbing the carotenoids.
Carotenoids are pigments in plants, and while they give carrots their color they act as antioxidants for humans and can be converted into Vitamin A when released into the body. They are also best absorbed when eaten along with fat (butter, cream, etc).
Carrot Recipes and Meal Ideas
Meals and Sides
We have a couple of carrot recipes on hand, but my One-Pot Ginger Carrot Maple Bisque has quickly become a family favorite. It is a great way to eat cooked fresh carrots without feeling like you are eating “cooked carrots.”

This year I made this bisque twice and then flat froze some portions in freezer bags to preserve and enjoy later.
To flat freeze – put your soup/bisque into freezer bags and remove as much air as possible. Then lay them flat on a sheet pan/cookie sheet and put it in your freezer. Once the contents of the bags are frozen you can take them off of the pan and stack them or stand them up (like books on a bookshelf) in your freezer.

While I grew up in a house that ate plain steamed vegetables, and truthfully I have carried on that tradition in my home. The one that my mom often got “adventurous” with was carrots. This simple and delicious carrot recipe was served many times at large meals shared with friends.
Orange Juice Carrots
What you need (serves four):
- 1.5 pounds carrots cut into 1/2″ pieces
- 1.5 cups orange juice
- 1 tbsp butter
- 1 tsp salt
- 1 tbsp maple syrup (optional)
What to do:
- Add everything to a small sauce pan
- Stir to combine
- Bring to a boil over medium heat stirring occasionally
- Reduce to medium/low heat and simmer for a 10-12 minutes (poke your carrots with a fork and turn off heat when it go in but the carrots are not yet soft)
- Turn off heat, let cool a bit, and serve with a slotted spoon
Preservation and Storage
This year I also wanted to find a way to freeze carrots to use later. Freezing raw carrots (or most vegetables for that matter) doesn’t provide you with a good end product, so we decided to go with blanching them.
Blanching carrots is not hard or time consuming. Blanching carrots before freezing is a great way to preserve your carrot harvest to have an easy side on hand for dinners.
How to Blanch Carrots
What you need:
- Carrots
- Salt
- Large Mixing Bowl
- 1/2 sheet pan/cookie sheet (that you can fit in your freezer
- Knife
- Strainer
- Ice Cubes
- Water
- Gallon size freezer bag
What to do:
1. Wash carrots
2. Bring 4 quarts of water to a boil
3. Roughly chop your carrots into 1/2″-3/4″ cube-ish pieces

4. Carefully add carrots (2-3 cups at a time) to boiling water, and boil for 3 minutes
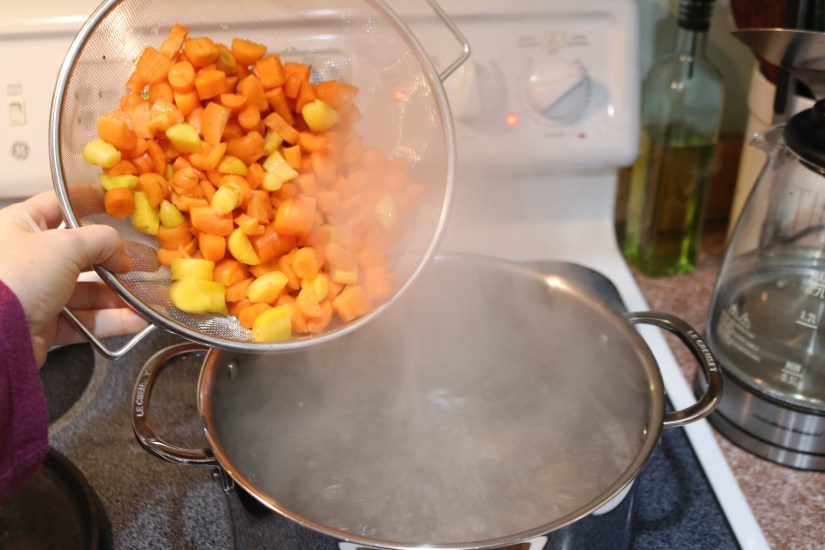
5. While carrots are boiling prepare a bowl of cold water with ice cubes (I like to use large cocktail ice cubes for this as it keeps them from quickly melting and makes it easy to pull them out when once you’ve stopped the cooking process)

6. When your 3 minutes are up, quickly strain your carrots and dump them into your ice water
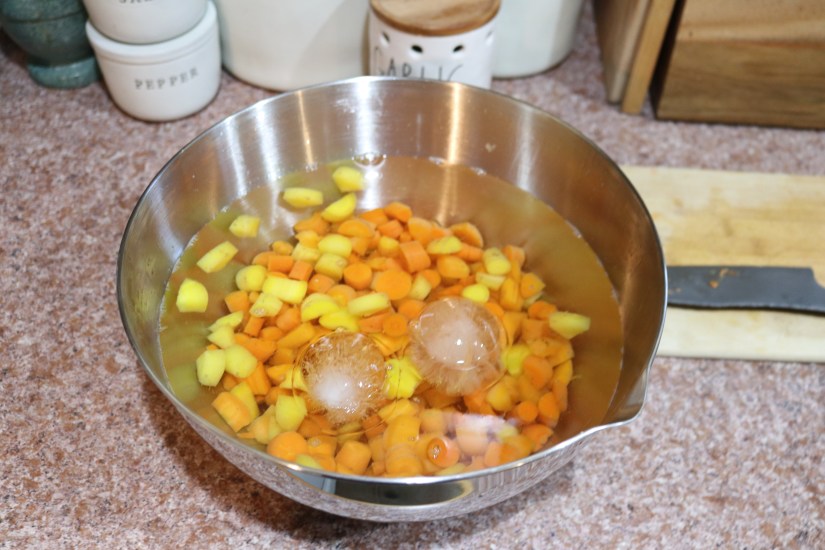
7. I use my hand to swirl the carrots around, get the water moving, and get them cooled down, while they are cooling prepare a half sheet pan with a piece of parchment paper, once they no longer feel warm, strain them again and spread them out on your parchment paper lined sheet pan.

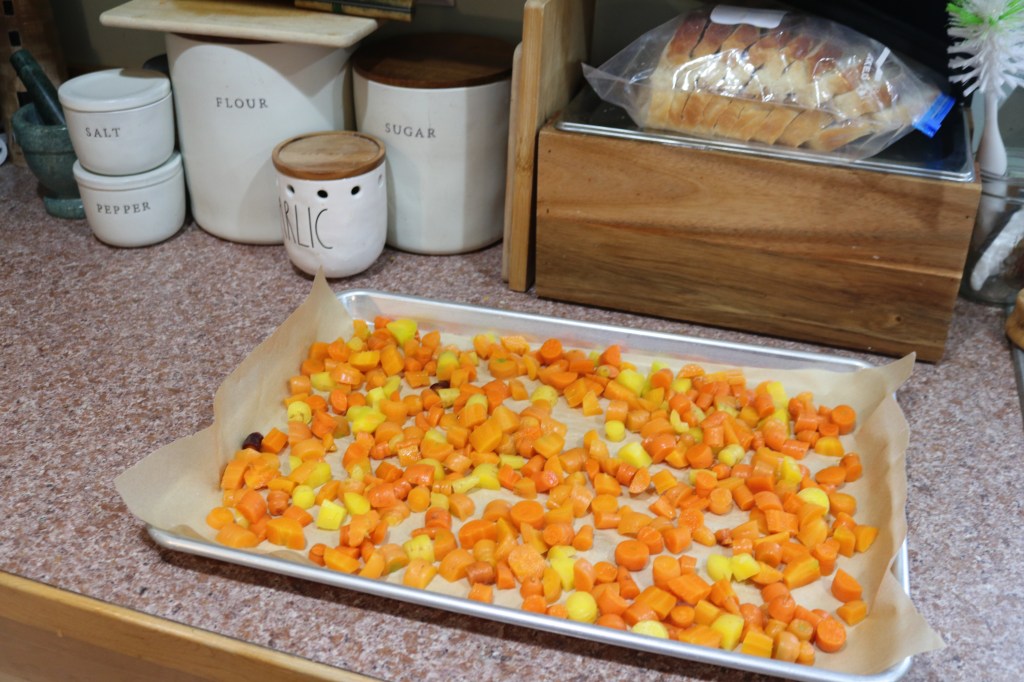
8. Place sheet pan in your freezer. If you had more carrots than just one batch, repeat the process, you don’t need to put another sheet pan in your freezer, just place another piece of parchment paper on top of the first batch of carrots and lay out your next batch on top of them. Just make sure you have a piece of parchment paper between the two batches.

9. Freeze for at least two hours and then transfer to your freezer bag using the parchment paper to form a funnel.
10. Label the bag and store in your freezer to use as needed until next year’s carrots can be used fresh.

So there you have it! Our carrot journey this year. I can’t wait to plant our carrot bed this coming spring so that we can do it all over again, and find new and delicious ways to eat and preserve our harvest. Thank you for coming along for the ride!
